As an avid shoe lover, I have long admired the great designs of Manolo Blahnik, Louboutin, Jimmy Choo and Sophia Webster, to name but a few. For one day only, thanks to a wonderfully thoughtful Christmas gift from my husband, I got to experience what it’s like to be that designer, on the amazing ‘become a shoe design icon’ course, run by ‘I Can Make Shoes’.
It was a wet Sunday when I made my way by train over to trendy East London – Bethnal Green and found The Pill Box where the courses are run; but nothing was going to dampen my enthusiasm.
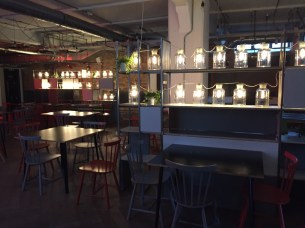
The arty Pill Box
It was a nice small class of 3 which made for a great learning environment. Our teacher Kiren was inspiring when she shared how she too had attended this course a few years back and now not only teaches but also is designing and making her own collection of shoes.
The class began with an introduction to the anatomy of a shoe. Before being able to design a shoe, it is important to understand all the components that make one up as this can have an influence on the art of the possible.
It can be quite daunting to be faced with a blank sheet of paper and just a template of a foot to design around, but we were given various books to get the creative juices flowing. I’m sure it will come as no surprise to most of you that my favourite of these was ‘Manolo’s New Shoes’.

Manolo uses watercolours, pencils and china ink to create his drawings which are works of art in their own right. Some are sketches and design concepts whereas others are created after the shoe has been made as a kind of portrait of the shoe. I would love to own one of his original drawings and came so close when I signed up for the launch of his wedding collection event where each attendee would receive a drawing but alas I was too late and the event was already full.
No one can fail to be inspired by his work and further books showed me the kinds of sources of inspiration designers use. I was particularly taken by the use of travel to inspire and from that began to look through photos of my own travels on my phone. My creativity was sparked by a photo I had taken at Parc Guell in Barcelona.
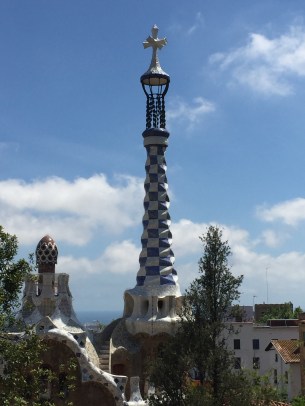
The tower turned upside down was the basis for the heel on my peep toe sandal which would be blue and white woven leather, with a blue ribbon to fasten it around the ankle. I also designed a second shoe based around some of my favourite things; it was a black court shoe with pink ribbons that laced up the ankle. On the front was a butterfly and the heel was designed like a champagne flute. I could have happily continued designing all day but the next step was making a template which would be used to cut out the leather.
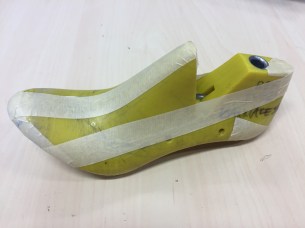
A last in the shoe size required is used to create this template. A last is like a mould made of wood or hard plastic which has a shape similar to a human foot. There are different lasts depending on the type of shoe being made i.e. flat shoe, heeled shoe, boot etc.
There are various ways of making the template which can then be used to cut the leather. The technique we were shown involved using masking tape. The strips of tape are applied in a certain order until the entire last is covered.


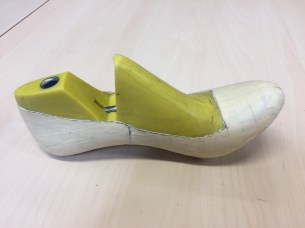
The next step is then to transfer the 2D design onto the last thus making it 3D and ensuring that each section is suitable comfort wise in relation to the foot. We all made a template for a simple court shoe as that forms the base of many high heels so is then a transferable skill.
Once the shoe is marked out, including the side seam as courts are rarely made in one piece; a craft knife is then used to cut round the lines. Excess tape is then removed leaving just the template design which can then also be carefully peeled off the last.
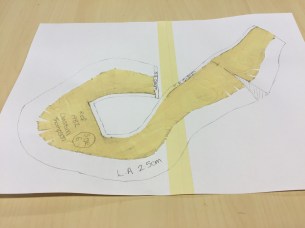
The template is then laid flat on a plain sheet of paper and stuck down. In order to make it flat, some little snips are required around the vamp (piece that covers the toes or the front part of the shoe) and the side seam. It is important to then write the last reference and the size on your template for future reference.


A line is then drawn around the masking tape to allow a 2.5cm lasting allowance which is the leather that will fold under the last and be joined to the inner-sole board and a 0.5cm folding allowance for the seam on the topline of the shoe as well as at the side seam where the two sides are joined.
This was as far as we went on this course but the next step in the shoe making process would be to cut out the template around the pencil lines, lay it on the leather and then cut the leather.

This has definitely made me want to go on to learn more and I would love to make my Parc Guell sandals – depicted on the left in my drawings above.
I highly recommend this course to any shoe fanatic! Many shoes are now mass-produced but the best ones are still hand-made and when you see the amount of work that goes into the process, it is no surprise that hand-made shoes command top dollar!
